
Utility rooms often become the unsung heroes of our homes – small spaces expected to handle everything from laundry to storage of cleaning supplies, tools, and seasonal items. Yet these hardworking areas frequently suffer from clutter and disorganization. According to home organization experts, the average utility room is only 25-50 square feet, with over 70% of homeowners reporting insufficient storage as their primary frustration.
The good news? Even the smallest utility room can be transformed into an efficient, functional space with the right organization strategies. Whether your utility area is a dedicated room or just a closet, maximizing every available inch can dramatically improve your home’s functionality and your daily routine.
In this guide, we’ll explore practical solutions for assessing your needs, utilizing vertical space, integrating appliances efficiently, and implementing smart storage systems that can work in spaces of any size. These proven strategies for transforming small spaces with space-saving solutions can be applied to create a utility room that works as hard as you do.
I. Strategic Planning: The Foundation for Maximum Utility Room Space
A. Assessing Your Utility Room Needs
Before purchasing storage solutions or reorganizing your space, take time to evaluate exactly what your utility room needs to accommodate. This thoughtful assessment will ensure your organization system works for your specific household.
Start by asking yourself these key questions:
- What primary activities take place in this space? (Laundry, pet care, cleaning supply storage, etc.)
- Which items do you access daily versus seasonally?
- What are your current pain points when using the space?
- Are there items currently stored here that could logically belong elsewhere?
- What would make your daily routines more efficient?
Understanding how your utility room serves your household is the crucial first step. The right mudroom storage solutions can be adapted for utility spaces, but only when tailored to your specific needs.
B. The Decluttering Process: Creating a Clean Slate
Decluttering is the essential foundation for any organization project. Without this step, even the most innovative storage systems will simply hide the problem rather than solve it.
Follow this methodical approach to decluttering your utility room:
- Empty completely: Remove everything from the space to truly see what you’re working with.
- Sort ruthlessly: Create separate piles for keep, donate, relocate, and discard.
- Question each item: Ask whether you’ve used it in the past year and if it truly belongs in this space.
- Group similar items: Categorize what you’re keeping by function (laundry, cleaning, tools, etc.).
- Identify duplicates: Many utility rooms harbor multiples of the same items – keep only what you reasonably need.
Be particularly critical of half-empty cleaning products, damaged tools, and those “just in case” items that have been sitting unused for years. Remember that organizing isn’t about finding places for everything you own – it’s about intentionally choosing what deserves your limited space.
C. Efficient Zoning for Workflow Optimization
Creating functional zones transforms how you use your utility room. Think of this space like a tiny factory – the layout should support the work that happens there.
Consider establishing these essential zones based on your household needs:
- Laundry zone: Area around washer/dryer with supplies within arm’s reach
- Cleaning supply zone: Grouped by room or cleaning task
- Household tools zone: Frequently used items at eye level
- Bulk storage zone: Less frequently accessed items in higher or lower storage areas
- Sink/work zone: Counter space for folding, sorting, or other tasks
For small utility rooms, zones might overlap or be simplified. The key is placing frequently used items at easily accessible heights (between waist and eye level), with less frequently used items stored higher or lower.
Similar zoning principles can be applied when you organize a small entryway bench, focusing on accessibility and logical groupings for maximum efficiency.
II. Vertical Solutions: Maximizing Wall and Ceiling Space
A. Customizable Shelving Systems for Every Budget
When floor space is limited, walls become your greatest storage asset. Shelving options range from budget-friendly to custom-built, each with distinct advantages:
- Fixed bracket shelving: Most affordable ($20-100); easy DIY installation; best for lighter items
- Adjustable track systems: Moderate cost ($75-200); offers flexibility to reconfigure as needs change; accommodates various shelf depths
- Floating shelves: Modern aesthetic; moderate cost ($30-150); creates cleaner visual lines but typically holds less weight
- Custom built-ins: Highest investment ($300+); maximizes every inch; can be designed around obstacles like pipes or vents
For utility rooms, prioritize function over form with these guidelines:
- Allow 12-16 inches between shelves for cleaning supplies, 8-10 inches for folded linens
- Install shelves all the way to the ceiling, using higher areas for seasonal or rarely used items
- Consider shelf depth carefully – deeper isn’t always better if it makes items hard to reach
- Use shelf dividers for storing stacked items like towels or linens
The principles of mastering mudroom open shelving apply equally well to utility rooms – visibility, accessibility, and thoughtful categorization are key.
B. Strategic Cabinet Placement and Organization
Cabinets offer the advantage of concealing visual clutter, which can make a small utility room feel instantly more organized. Strategic cabinet placement maximizes both storage and workflow:
- Install upper cabinets to the ceiling to capture often-wasted space
- Consider slim cabinets (12 inches deep instead of standard 24) for tight spaces
- Utilize corner spaces with specialized solutions like rotating lazy susans
- Add internal organizers like pull-out drawers, dividers, or tension rods
For maximum efficiency, place cabinets based on what they’ll store. Cleaning supplies often work well in upper cabinets (away from children), while heavier items should be stored in lower cabinets to avoid lifting hazards.
Our mudroom bench cabinets feature space-saving designs that can be equally effective in utility rooms, combining storage with functional surfaces.
C. Wall-Mounted Solutions Beyond Shelves
Walls can do more than just support shelves. Consider these alternative wall-mounted storage options:
- Pegboards: Infinitely customizable; ideal for tools and accessories; allows frequent reconfiguration
- Hook rails: Simple and inexpensive; perfect for brooms, mops, and other long-handled tools
- Magnetic strips: Excellent for metal tools and small accessories
- Towel bars: Repurposed for hanging cleaning cloths or spray bottles
- Wire grids: Can be configured with various attachments for different storage needs
Most of these systems can be installed for under $50 and significantly expand your storage capacity without consuming floor space. For maximum effectiveness, mount these systems near where related tasks are performed.
D. Ceiling Storage: The Often-Forgotten Space
The ceiling represents untapped storage potential in most utility rooms. Consider these overhead solutions:
- Hanging racks: Suspended from ceiling joists; ideal for lighter, bulkier items
- Pulley systems: Allow easy raising and lowering of heavier items
- Overhead tracks: Sliding bins can be pulled down when needed
- Simple hooks: For hanging items like drying racks when not in use
When installing ceiling storage, keep these guidelines in mind:
– Ensure at least 6.5 feet of clearance below hanging storage for safe passage
– Verify weight limits based on mounting methods (ceiling joists can typically support 50-100 pounds when properly secured)
– Reserve this space for lightweight, bulky, or seasonal items accessed only occasionally
Our versatile entryway bench shelf storage concepts can inspire creative vertical arrangements in utility spaces as well.
III. Appliance Integration: Space-Efficient Laundry Solutions
A. Stackable Units and Vertical Configurations
Stacking your washer and dryer can reclaim approximately 15 square feet of floor space – a significant amount in small utility rooms. Consider these factors for successful stacking:
- Ensure you have compatible machines (front-loading washers only)
- Use manufacturer-recommended stacking kits for safety ($35-100)
- Allow 1 inch clearance on sides and 4-6 inches behind for connections
- Consider a step stool for shorter household members to safely access controls
- Ensure at least 12 inches clearance above for proper ventilation
The space reclaimed by stacking can be used for a folding station, additional storage, or simply to create more comfortable movement area in the room.
B. Creating Functional Surfaces and Storage Around Appliances
The spaces around and above appliances offer prime opportunities for additional functionality:
- Install a countertop above front-loading machines (standard height: 36 inches) for folding space
- Add pedestal drawers beneath machines for laundry supplies (though this prevents stacking)
- Utilize the narrow gap between machines or between machines and walls with slim rolling carts (as narrow as 6 inches wide)
- Install a hanging rod above appliances for air-drying delicate items
Custom solutions that integrate appliances into cabinetry create the most streamlined appearance, but simple DIY approaches can be equally functional. Even small utility rooms can incorporate practical work surfaces with these methods.
These strategies echo our approach to space-saving entryway ideas – finding multifunctional possibilities in every available inch.
C. Space-Efficient Appliance Alternatives
For extremely limited spaces, consider these compact appliance alternatives:
- All-in-one washer/dryer combos: Save space but typically have smaller capacity and longer cycle times
- Compact European-style machines: Up to 30% smaller footprint than standard American models
- Ventless heat pump dryers: Eliminate the need for exterior venting, allowing more flexible placement
- Wall-mounted or corner utility sinks: Use space more efficiently than standard floor models
These specialized appliances often come with higher price tags but can make the difference between a functional utility room and an impossibly cramped space.
IV. Smart Storage Accessories and Organization Systems
A. Container Systems: Bins, Baskets, and Labeled Storage
The right containers transform how efficiently you can use your storage space:
- Use clear containers for visibility or consistent color-coding by category
- Choose rectangular rather than round containers to maximize shelf space
- Implement a labeling system that everyone in the household can understand
- Measure your shelves before purchasing to ensure perfect fits
- Consider stackable containers with secure lids for items used less frequently
Particularly effective in utility rooms are narrow bins for cleaning bottles, divided containers for small parts and tools, and handled baskets for items frequently carried to other rooms.

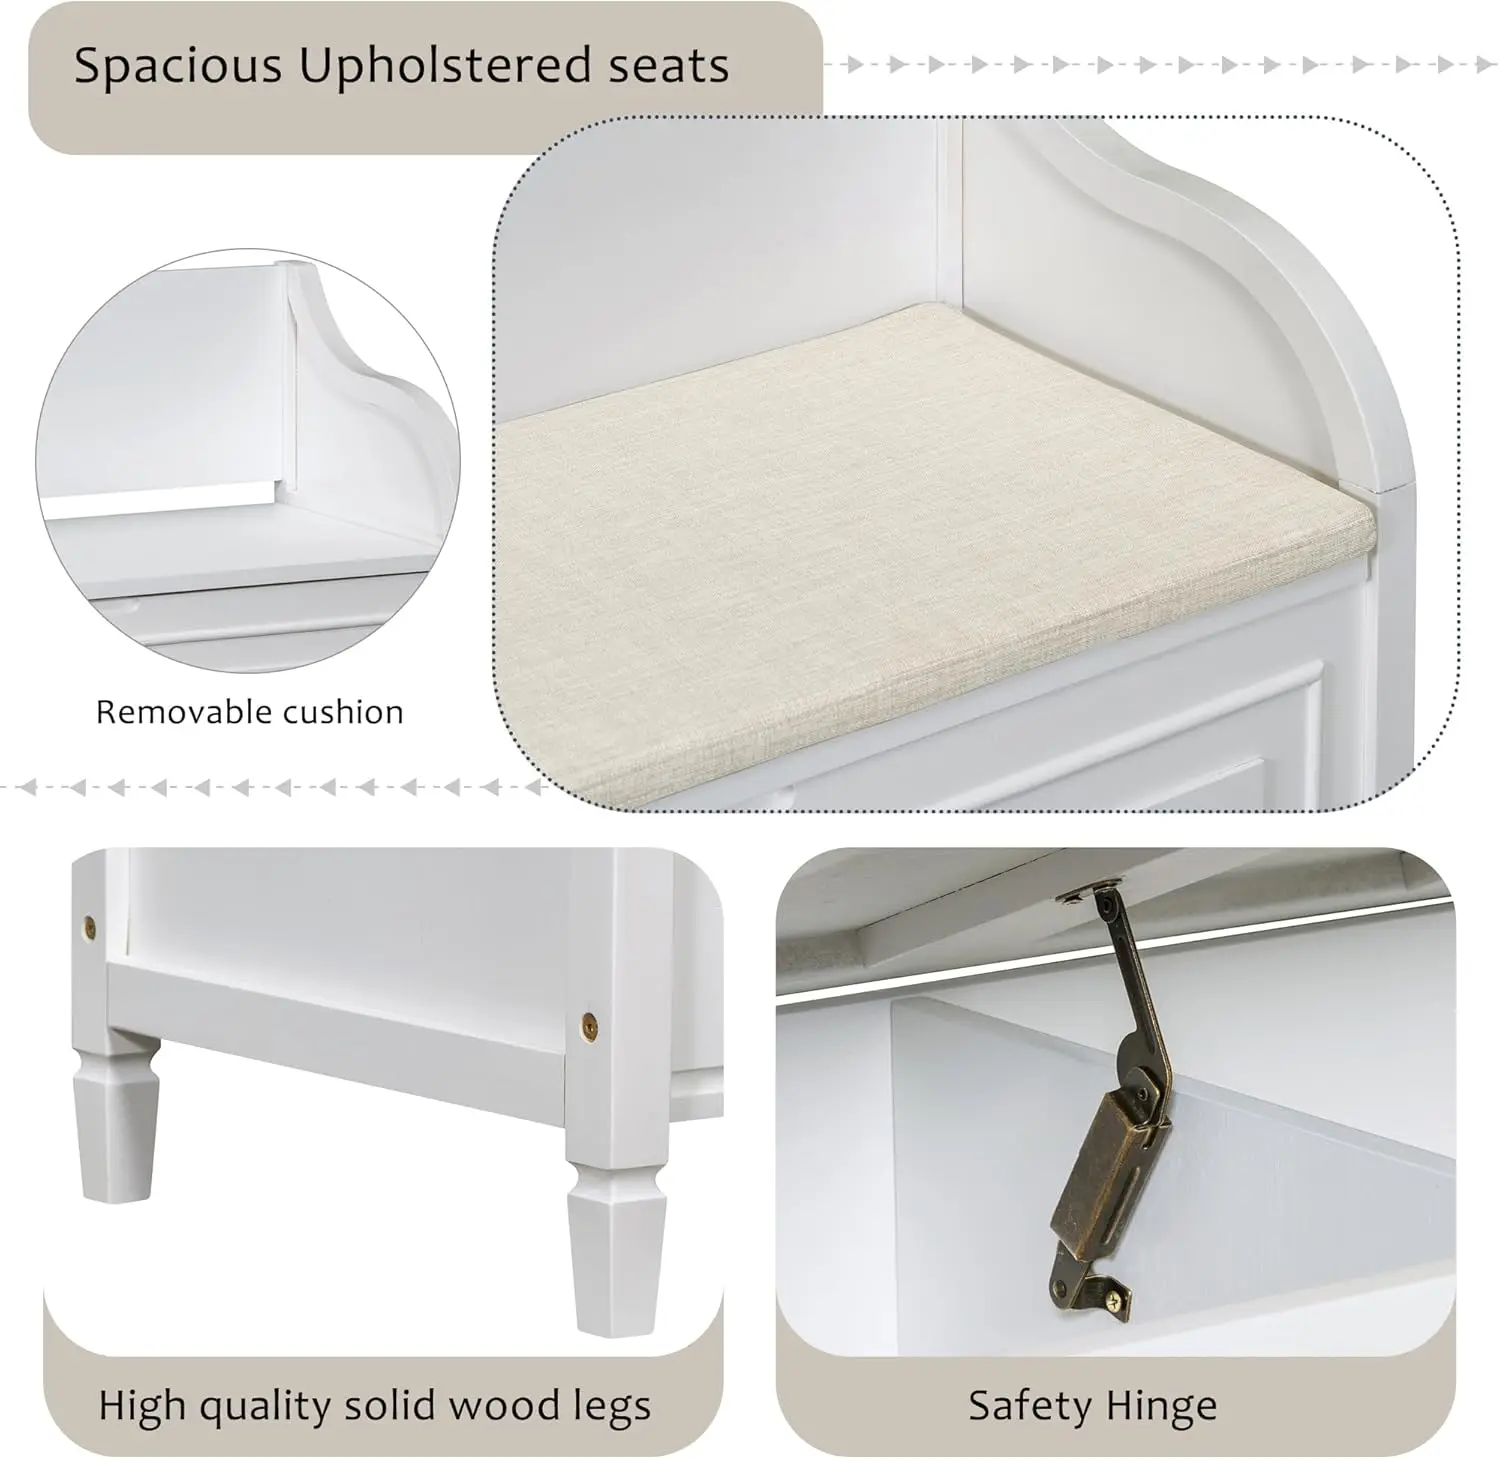
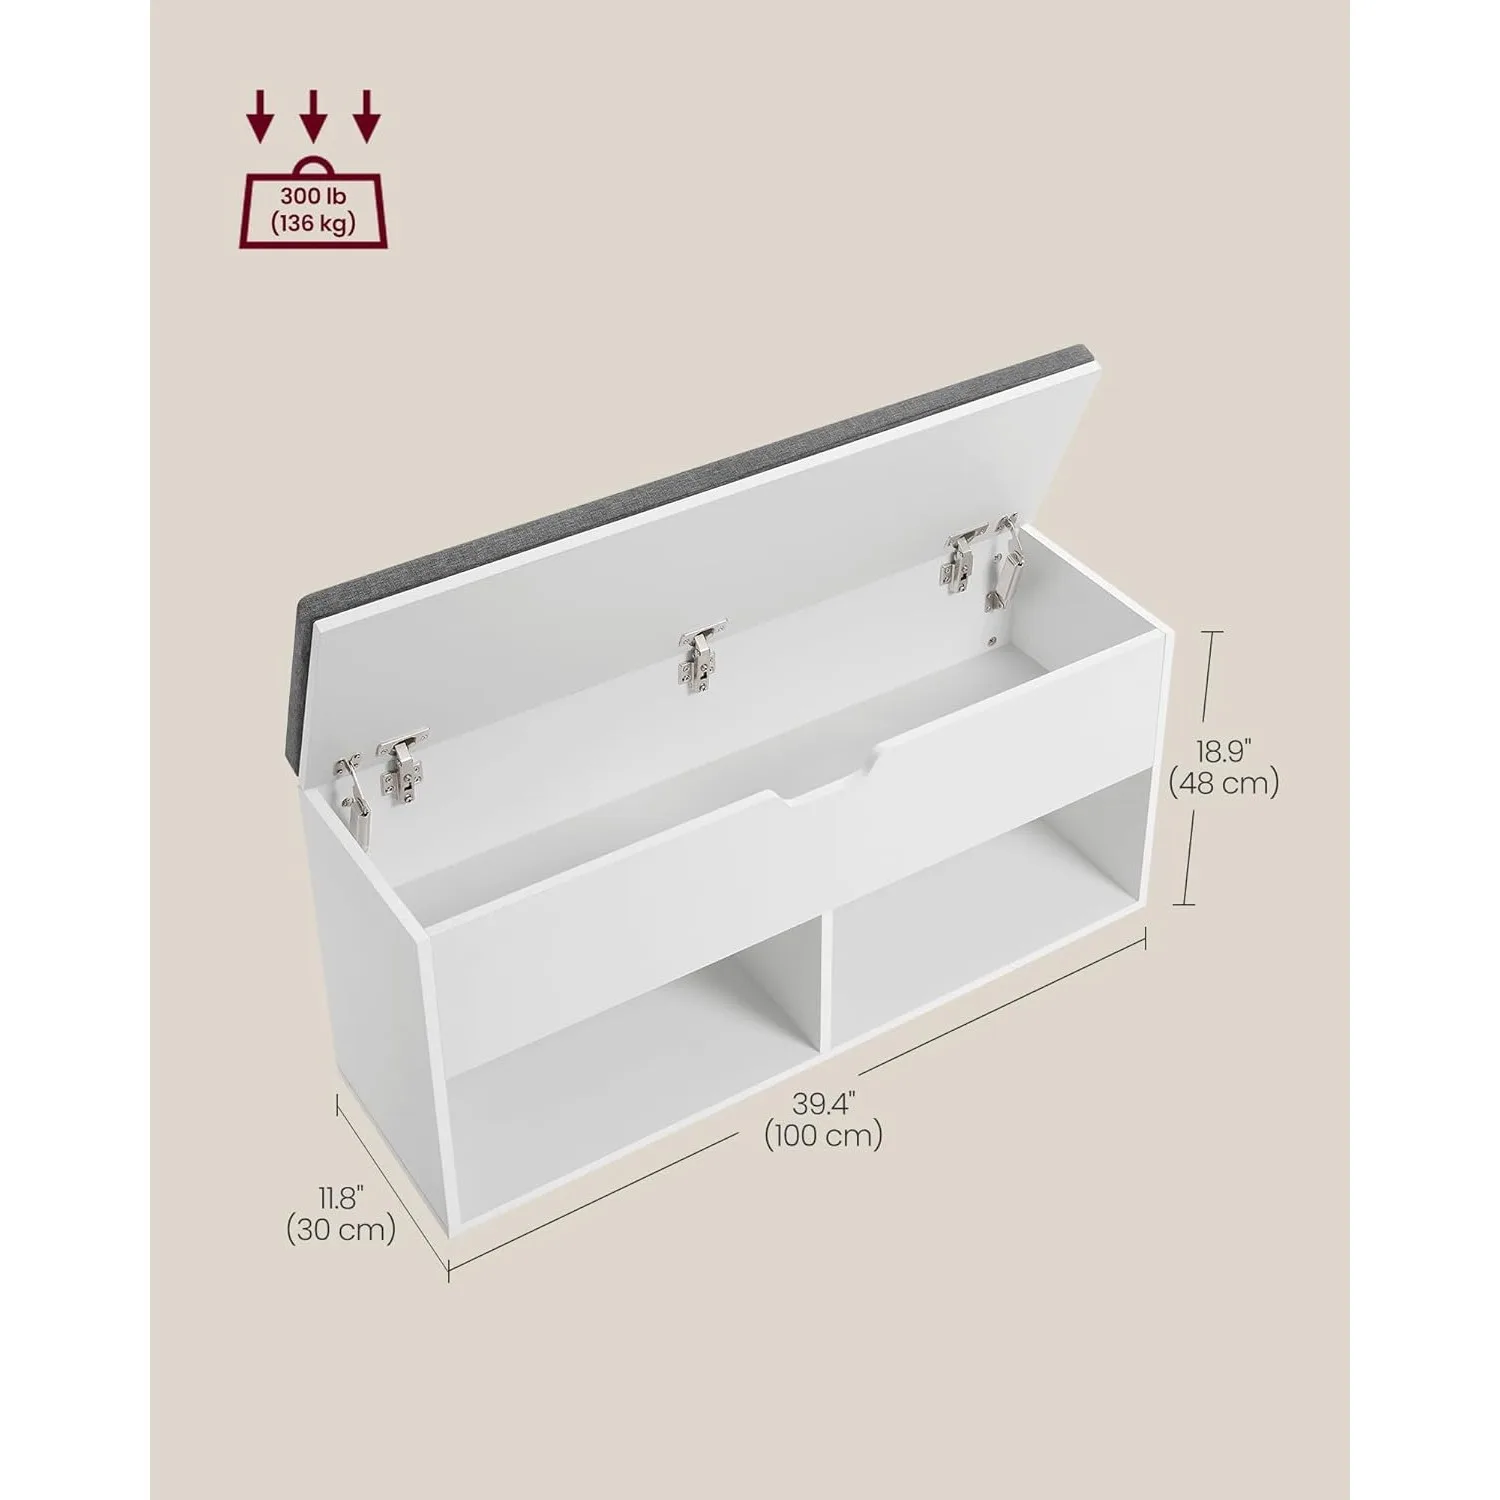
Entryway Bench with Cushion, Mudroom Bench with Cushion, Shoe Bench for Entryway
$1,186.63 Select options This product has multiple variants. The options may be chosen on the product page
Coat Rack Shoe Bench, Corner Entryway Bench, Corner Hall Tree, Shoe Bench for Entryway
$313.58 Select options This product has multiple variants. The options may be chosen on the product page
Entryway Bench with Shelf Storage, Shoe Bench for Entryway, Shoe Storage Bench
$194.08 Select options This product has multiple variants. The options may be chosen on the product page
Corner Entryway Bench, Entryway Bench with Cushion, Modern Entryway Bench, Shoe Bench for Entryway
$476.34 Select options This product has multiple variants. The options may be chosen on the product page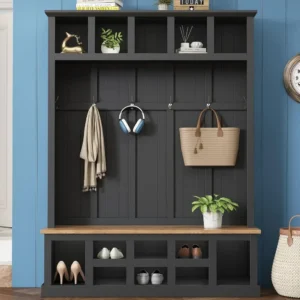
Bench with Hooks and Storage, Entryway Hall Tree, Mudroom Bench with Cubbies, Mudroom Bench with Shoe Storage
$818.38 Select options This product has multiple variants. The options may be chosen on the product page
Modern Entryway Bench, Wood Entryway Bench, Wood Mudroom Bench
$497.69 Select options This product has multiple variants. The options may be chosen on the product page
B. Pull-Out Solutions and Space Maximizers
Accessing the depths of cabinets and shelves becomes much easier with these pull-out systems:
- Drawer organizers: Keep small items sorted and visible
- Cabinet pull-outs: Transform deep cabinets into accessible storage
- Sliding between-appliance storage: Makes use of narrow gaps as little as 6 inches wide
- Retractable hooks and hanging systems: Extend when needed, fold away when not in use
These systems are particularly valuable in utility rooms where many small items need organization. Most can be retrofitted into existing cabinets without major renovations.
Our entryway bench drawers feature similar pull-out solutions that maximize storage while maintaining easy access.
C. Mobile and Flexible Storage Solutions
Not every storage solution needs to be permanently installed. Mobile options offer adaptability:
- Utility carts: Can be moved where needed and tucked away when not in use
- Folding tables or ironing boards: Provide work surfaces only when required
- Collapsible drying racks: Offer functionality without permanent space commitment
- Hanging organizers: Can be moved between locations as needs change
Three-tier rolling carts (approximately $30-80) are particularly useful in utility rooms, serving as mobile cleaning supply stations or laundry sorting assistants. Look for versions narrow enough to fit between appliances when not in use.
For flexible seating combined with storage, our utility room multi-purpose benches offer smart solutions that adapt to changing needs.
V. Multifunctional Design: Dual-Purpose Elements for Small Spaces
A. Convertible Work Surfaces and Folding Stations
Maximizing function doesn’t always require permanent fixtures. Consider these adaptable work surfaces:
- Wall-mounted drop-leaf tables that fold flat when not in use
- Pull-out cutting boards installed between cabinets
- Over-appliance work surfaces that slide forward when needed
- Fold-down ironing boards that integrate into cabinetry
- Counter-depth tops that double as sorting areas and folding stations
The ideal work surface height is typically 36 inches, but this should be adjusted based on the primary user’s height and the main tasks performed. A space as small as 24 inches wide can serve as an effective folding station when thoughtfully designed.
B. Space-Efficient Door Solutions
The door itself – and the space it requires to swing – represents a significant consideration in small utility rooms:
- Pocket doors: Save approximately 10 square feet of swing space but require wall cavity
- Barn doors: Slide along the wall rather than swinging into the room
- Bifold doors: Require about half the swing space of standard doors
- Door-mounted storage: Utilizes the door itself for organization with over-door hooks or racks
Door-mounted storage systems are ideal for lightweight, frequently accessed items like ironing supplies, small tools, or cleaning cloths. Most can be installed without permanent damage to the door.
C. Utilizing Awkward Corners and Nooks
Those challenging corners and recesses that seem impossible to use efficiently can become storage assets with specialized solutions:
- Corner shelving units that fit precisely into 90-degree corners
- Lazy susans to make deep corner cabinets accessible
- Custom-cut countertops that follow wall contours
- Angled storage bins designed specifically for corners
- Tension rod systems that can adapt to unusual dimensions
Even the smallest nooks can serve specific purposes – a 6-inch gap between appliances can hold a slim rolling cart, while an awkward corner might perfectly fit a specialized cleaning tool station.
Our corner entryway bench designs demonstrate how effectively challenging corners can be transformed into functional space – principles that transfer beautifully to utility room planning.
VI. Design Elements That Create Visual Spaciousness
A. Color, Lighting, and Visual Expansion
Strategic design choices can make even the smallest utility room feel more spacious and pleasant to use:
- Light colors (particularly cool whites and pale blues) visually expand space
- Task lighting directly above work areas improves functionality
- Overhead lighting should be bright but diffused to minimize shadows
- Under-cabinet lighting illuminates countertops and reduces dark corners
- Mirrors or other reflective surfaces can bounce light and create visual depth
Proper lighting is especially important in utility rooms where detailed tasks like stain removal or small repairs often take place. Consider LED options (2700-3000K for warm light, 4000-5000K for task-oriented spaces) that provide bright illumination without excess heat.
B. Flooring and Surface Choices for Limited Spaces
Your choice of materials impacts both the visual size of the space and its practicality:
- Large-format floor tiles with minimal grout lines create a sense of expansiveness
- Continuous flooring (without thresholds or transitions) flows better visually
- Light-colored but practical surfaces (quartz countertops, luxury vinyl flooring) balance aesthetics with durability
- Semi-gloss or gloss paint finishes on walls are both more reflective and more washable
- Consistent color schemes throughout create cohesion and visual calm
Remember that utility rooms demand practical, water-resistant materials above all else, but these can still be selected in space-enhancing colors and patterns.
The same principles we apply when designing functional mudrooms work equally well in utility spaces – prioritizing durability while maintaining aesthetic appeal.
VII. Budget-Friendly Maximizing Strategies
A. DIY Space-Saving Projects for Utility Rooms
Creating custom storage doesn’t require professional skills or huge budgets. Consider these approachable projects:
- Simple floating shelves: Basic brackets and lumber ($25-40 per shelf)
- PVC pipe sorting system: Inexpensive solution for storing brooms and long-handled tools ($15-20)
- Repurposed kitchen cabinets: Often available free or cheaply from renovation projects
- Under-shelf baskets: Hook onto existing shelves to double storage capacity ($10-15 each)
- Pegboard organization wall: Complete system with hooks for under $50
Most of these projects require only basic tools and can be completed in a weekend. The key is measuring carefully and planning the system around your specific storage needs.
B. Low-Cost Store Solutions and Shopping Strategies
Ready-made organization doesn’t have to break the bank if you shop strategically:
- Look for modular systems that can be expanded over time as budget allows
- Consider multi-packs of matching containers for consistent storage appearance
- Check home improvement store clearance sections for discontinued cabinet models
- Look beyond standard “laundry room” products – often kitchen or office organizers work just as well at lower prices
- Invest in quality for frequently used items while saving on rarely accessed storage
Discount stores, dollar stores, and secondhand shops often offer perfectly functional storage solutions at a fraction of specialty store prices.
VIII. Maintaining Your Organized Utility Room
A. How Often Should You Reassess Your Utility Room Organization?
Even the best organizational system requires periodic maintenance:
- Schedule quarterly “reset” sessions to ensure everything remains in its designated place
- Conduct a more thorough evaluation of your system annually, adjusting for changing household needs
- Address small areas of clutter immediately before they expand
- Rotate seasonal items to more accessible locations as needed throughout the year
Consider setting calendar reminders for these maintenance sessions – they typically require only 15-30 minutes but prevent the need for complete reorganization later.
B. Can Everyone in the Household Maintain the Organized System?
The most beautiful organization system fails if it isn’t used consistently by everyone:
- Involve all household members in the planning and organization process
- Use simple, clear labels that make the system intuitive
- Consider height and accessibility for all family members, including children who help with chores
- Create visual guides for where items belong (photos can be helpful for younger children)
- Make the “correct” choice the easiest choice – place frequently used items at the most convenient access points
Remember that simpler systems are more likely to be maintained by everyone in the household.
Summary
Transforming your utility room from cluttered chaos to organized efficiency doesn’t require massive space or budget – just thoughtful planning and strategic implementation. Start with a thorough decluttering, then maximize every vertical inch while creating logical zones for your specific household tasks.
Remember that even small improvements can dramatically impact how functional your utility room feels. Something as simple as adding proper lighting, installing a few strategic shelves, or implementing a consistent container system can transform your daily experience.
By applying these space-maximizing principles, your utility room can become what it’s meant to be – not just a storage area, but a genuinely functional workspace that makes household tasks easier and more efficient.